Tsouknidopita – Greek Stinging Nettle Fillo Pie
Antigoni’s Tsouknidopita – Greek Stinging Nettle Fillo Pie Recipe
My mum’s Tsouknidopita – Stinging Nettle Pie!
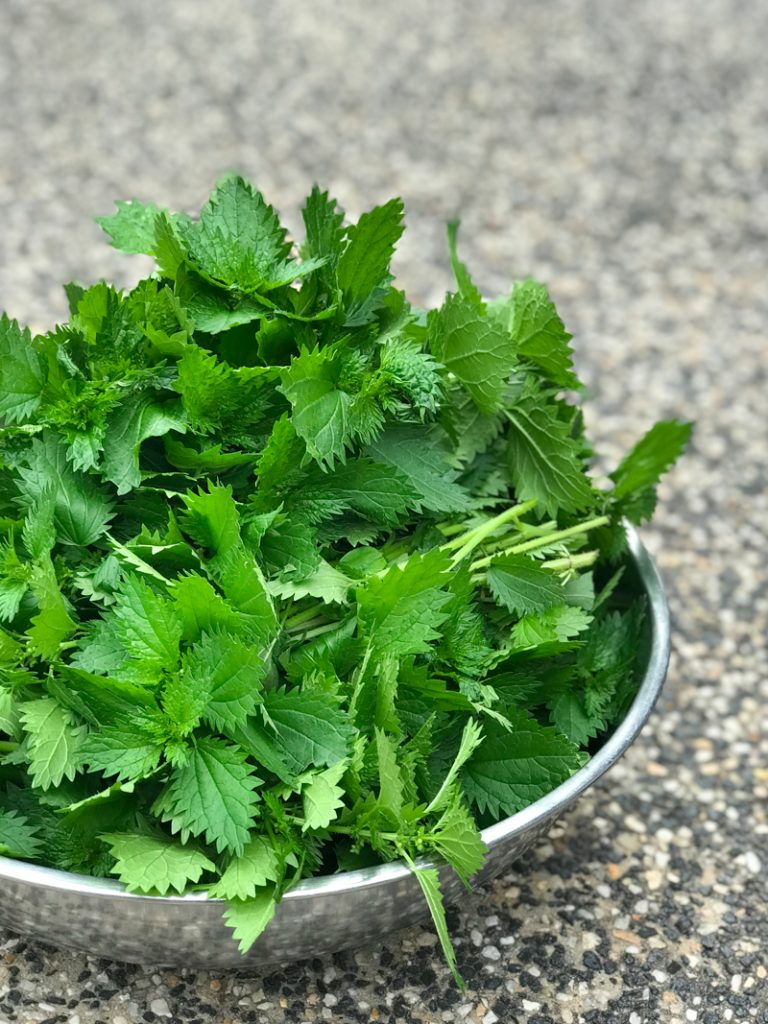
In Greece, my mum collected the stinging nettles along the creek beds under the majestic Meteora. In Australia, they self-seed and grow in her veggie patch in Autumn and Spring and then we are the lucky recipients of her beautiful pita creations!
Over the 70 years, she has been collecting stinging nettles, her hands have been tolerised of their sting, and she either uses her bare hands to collect them or the very thin gloves shown in the video. May I suggest you use heavy duty gardening gloves to collect yours!!!!
Once the nettles are massaged and gently macerated with salt, they lose their sting.
Watch now as my mum makes this deliciously sweet, herbaceous pie originating in Meteora, Greece!
Servings 12
Ingredients
For the dough
• 500 g Plain flour or All Purpose flour
• 1 tsp salt
• ¼ cup extra virgin olive oil
• 1 – 1 ½ cups tap water, warm
• 1 tbsp white vinegar
For the flour–corn starch mixture (used to dust the fillo with as you roll it out)
• 500 g Plain flour or All Purpose flour
• 150 g cornflour or cornstarch
For the filling
• A large bowl of stinging nettles (the equivalent in volume of 2 bunches of spinach)
• 6 small-medium brown onions, diced
• 3 eggs, lightly beaten
• ½ - 2/3 cup fine polenta
• 1 cup extra virgin olive oil (EVOO), extra for drizzling
• 3 - 4 tsp salt
Instructions
Making the dough
o Combine the flour and salt in a large bowl. Add the olive oil and vinegar and rub it into the flour – it will have the texture of oily, clumpy flour.
o Add one cup of warm water and combine it with the flour mixture. At this stage, there will be unincorporated flour. Add about 1/8 cup of water at a time to the bowl and mix it in well. Once all the flour is incorporated stop adding water. I usually use about 1 ¼ cups of water in total.
o Turn your dough onto your work surface and knead it for 1-2 minutes (no need to knead any longer!). It will look a little ragged, lumpy and uneven in texture and colour – that is okay!
o Place the dough in a bowl, cover it with a clean damp towel (wet the towel completely and wring it out) and leave it to rest at room temperature for at least 1 hour (2 hours is better and 3-4 hours is even better).
Preparing the ‘flour - corn flour’ dusting mixture
o Combine the plain flour with the corn flour well. This ‘flour - corn flour’ mixture is used to dust the fillo whenever it gets a little tacky, as you are rolling it out. Whatever you don’t use, store it away for the next time you make pita.
Preparing the filling
o Gather the stinging nettles into little bunches. Cut and discard the coarse stalks at the base of the bunch. Coarsely chop the stinging nettles, wash them well and drain them.
o Add 2 teaspoons salt to the stinging nettles and massage into nettles
o Place the slightly macerated nettles into a large bowl
o In another bowl add the diced brown onions and 1 – 2 teaspoons salt and massage into onions for a minute or so
o Add the onions with the nettles
o Add the onions with the nettles
o Set aside
Making the fillo pastry
o After the dough has rested, knead it for 1 minute and then divide it into 8 equal portions. Roll each portion into a ball. Place the balls on your clean work surface and cover them with the same damp towel.
o Take a large pinch of the dusting flour and place it in the centre of your work area.
o Take one of the balls of dough and roll it into an even, rounded sphere between the palms of your hands. Flatten the sphere between the palms of your hands, so it forms a small, round disc. Place the disc on the dusting flour on your work surface. Turn the discover so both sides are coated well with the dusting flour. Using the rolling pin, roll out the disc one way and then the other, so it forms a larger disc of approximately 15-20cm in diameter.
o Wrap the fillo tightly around the centre of the rolling pin, leaving a small section of the disc hanging out. Then, starting with both hands in the middle of the rolling pin, press down lightly on the fillo while simultaneously moving your hands away from each other. You can use your fingers or the palms of your hands to lightly and evenly press down on the fillo as you move your hands away from each other. Repeat this action of gently pressing down while moving your hands towards the outer edges of the fillo 2-3 times.
o Raise the rolling pin into the air, rotate it 90 degrees clockwise or anticlockwise and then lower it and unravel the fillo sheet onto your work surface.
o Wrap your fillo sheet snuggly onto the rolling pin, remembering to leave a small section hanging out.
o Again, starting with both hands in the middle of the rolling pin, press the fillo lightly with your fingers or palms, while moving your hands away from each other – repeating this pressing/outward-moving action 2-3 times.
o Continue to perform the last two actions until your fillo sheet is about 60cm in diameter.
o If/when the fillo becomes tacky as you roll it out, dust it liberally with some of the dusting flour (do not hold back).
o You continue to do this until your fillo is about 50-60cm in diameter.
o Generously oil the base of a medium-large rectangular pan and drape the fillo sheet across the pan and over the edges of the pan - drizzle the sheet with EVOO.
o Roll out a second fillo sheet. The 2nd sheet is placed completely inside the pan and drizzled with EVOO.
o The 3rd fillo sheet drapes outside the pan and is drizzled with EVOO.
o The 4th fillo sheet is placed completely inside the pan.
o Add 2/3 of the tsouknidopita filling to the pan.
o The 5th fillo sheet is placed completely inside the pan.
o Add the remaining filling to the pan.
o Fold in the overhanging edges of the 3rd fillo sheet and drizzle these with EVOO.
o The 6th, 7th fillo and 8th sheets are placed completely inside the pan and drizzled with EVOO.
o Fold in the overhanging edges of the 1st fillo sheet.
o Drizzle the top of the tsouknidopita with EVOO and sprinkle some water on top too - very gently massage the oily water into all the nooks and crannies.
Baking the tsouknikopita
o Bake at 180°C fan-forced for 1 ¼ - 1 ½ hours, until the top and base of the spanakopita are deep, golden-brown.
Serving the tsouknikopita
o Allow the tsouknikopita to cool for 30 minutes or so before serving with a salad for a ‘simple’ meal, as a side to your main meal or as part of a grazing buffet.
Kali Orexi!