Vasiliki’s Galatopita
This KO Signature Recipe features Vasiliki, Rita’s mum, making another one of her signature desserts, Galatopita. This is a dessert Vasiliki grew up enjoying in Kastraki, where her mother and sisters made it with sheep’s milk from their family’s farm. Vasiliki’s mother-in-law taught her how to make galatopita when she came to Australia, as a young bride. Vasiliki has made it countless times since then and it is now one of her family’s all-time favourite desserts, especially her granddaughter’s (who shares her name with her yiayia). In fact, young Vasiliki frequently chooses it for her birthday cake… how cool is that?! Wishing you kali epitichia – best success – in making this dessert and hoping that it becomes one of your signature desserts and birthday cakes too!
Ingredients
For the dough you will need…
3 cups plain flour
1 teaspoon salt
1/4 cup olive oil extra virgin
1 cup tap water warm
flour to dust work surface
For the fillo pastry you will need…
rested dough
flour to dust work surface
Traditional rolling pin
fillo-pastry rolling pin
olive oil extra virgin
1 soup spoon sugar heaped
cinnamon
baking dish 38cm
For the custard you will need…
1 large pot
2 litres milk extra creamy
10 soup spoon flour plain sifted
2 eggs large
1/8 teaspoon salt
125 g butter
2 1/4 cups sugar white
1/2 teaspoon sugar vanillin
For the basting you will need…
1 egg yolk
1 teaspoon milk
20 g butter melted
2 basting brushes
Preparation
Watch the full recipe video below. Subscribe to my YouTube channel by clicking the Subscribe link on the video
Make the dough…
Combine the flour and salt in a large bowl. Add the olive oil and rub it into the flour
Slowly add one cup of warm water and completely combine it with the flour mixture, so that it forms a soft, workable dough that doesn’t stick to your hands or the bowl
Depending on the type of flour you use, you may need to add extra water to make the dough soft
Turn the dough onto a floured bench and knead it for 1-2 minutes
Place the dough in a bowl, cover it with cling wrap and leave it to rest at room temperature for at least 2 hours
Make the fillo pastry…
After the dough has rested, divide it into 5 portions and roll each portion into a ball. Dust each ball of dough with flour and set the balls aside
Take one of the balls of dough, place it on a floured work surface and roll it out with a regular rolling pin, so it forms a disc of approximately 20cm in diameter. Set aside. Repeat with the remaining balls of dough
Take one of the discs of dough and wrap it around the fillo-pastry rolling pin. Then, starting with both hands in the middle of the fillo-pastry rolling pin, press the fillo lightly while moving your hands away from each other. Repeat this pressing/drawing action 3-4 times
Unravel the fillo sheet and rotate it 90 degrees on your work surface
If the fillo becomes sticky, dust it with a little flour
Wrap the fillo onto the rolling pin again
Again, starting with both hands in the middle of the fillo-pastry rolling pin, press the fillo lightly while moving your hands away from each other – repeating this pressing/drawing action 3-4 times
Again, unravel the fillo sheet and rotate it 90 degrees on your work surface
If the fillo becomes sticky, dust it with a little flour again
You continue to do this until your fillo is about 60cm in diameter
Generously oil the base of a 38cm pan and drape the fillo sheet across the pan and over the edge of the pan. Drizzle the sheet with olive oil
Roll out a second fillo sheet. Drape that over the pan too, again draping some of the fillo over the edge of the pan. Drizzle some oil on top of the second fillo sheet
Roll out a third fillo sheet and place it completely inside the pan. Draw this fillo sheet up the sides of the pan and press it against the fillo sheets below, to hold it there. Drizzle the fillo sheet with a little oil and then sprinkle it with cinnamon and one heaped soup spoon of sugar
Roll out a fourth sheet of fillo, place it completely within the pan and drizzle it with oil
Roll out a fifth fillo sheet and place it completely inside the pan. Draw this fillo sheet up the sides of the pan and press it against the fillo sheets below, to hold it there. Drizzle it with a little oil
Place a tea towel over the pan to stop the fillo from drying out and set aside
Prepare the custard…
Place a large pot on high heat and add the milk, flour, eggs and salt to the pot. Whisk the ingredients until all the flour has dissolved and the eggs have completely mixed through
Once the flour has dissolved in the milk, use a wooden spoon to stir the mixture
Add the butter and continue to stir the mixture
As the mixture begins to thicken, it forms lumps. Don’t worry – just continue stirring it until it thickens evenly
Once the mixture has thickened evenly, add the sugar and vanillin sugar and stir these through thoroughly
The custard is ready when it begins to form bubbles – then you know the flour has cooked through properly
Add the custard filling and baste the galatopita…
Pour the custard into the baking tray and where required, smooth it out with a wooden spoon so that it forms a thick, even layer
Drizzle the fillo that is overhanging the pan with olive oil. Then twist it to form a braid and lay it down on the custard
Beat one egg yolk with a teaspoon of milk and baste the custard with this mixture
Using a second basting brush, draw up some of the oil at the edge of the pan and baste the fillo braid with this
Finally, using the latter brush, baste the fillo braid with 20g of melted butter too
Bake the galatopita…
Place the galatopita in an oven preheated to 200ºC and bake it for approximately one hour (not less)
Check the galatopita after 10 minutes or so and place foil over any glazed areas that have browned
Continue to check every 10 minutes or so throughout the baking process and add more foil to the browned sections of custard, but not on top of the fillo braid
Serve the galatopita…
Once the galatopita has baked for an hour and the fillo pastry has browned, remove the galatopita from the oven
Allow the galatopita to cool so that the custard can set properly – approximately 2 hours
Sprinkle a thin, even layer of cinnamon over the baked custard
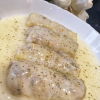
Slice the galatopita and serve
Enjoy!